
You can remove Windows Store apps with PowerShell when an AppX package problem prevents Sysprep from validating a Windows 10 or Windows 11 reference image.
Check the Sysprep logs first. If one package is named, remove only that package. Use broad cleanup only on a backed-up reference image.
Quick Answer
Open PowerShell as Administrator.
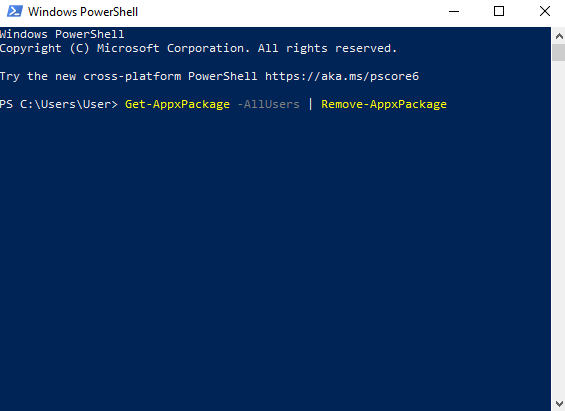
Remove installed AppX packages:
Get-AppxPackage -AllUsers | Remove-AppxPackageRemove provisioned packages from the Windows image:
Get-AppxProvisionedPackage -Online | Remove-AppxProvisionedPackage -OnlineRestart Windows when both commands finish. Then run Sysprep again:
%WINDIR%\System32\Sysprep\Sysprep.exe /generalize /oobe /shutdownSome protected Windows components may remain. A few removal errors do not always mean the entire cleanup failed.
Video: Fix Sysprep AppX Errors with PowerShell
The video below shows how to check the Sysprep logs, remove AppX packages, restart the reference PC, and try Sysprep again.
Use broad cleanup only on a backed-up reference image. Check the Panther logs before removing packages.
1. Why Microsoft Store Apps Can Block Sysprep
Sysprep checks Microsoft Store package states before Windows is generalized.
A failure can occur when an app is installed or updated for one user, but its provisioned state does not match the reference image.
A typical log message looks like this:
Package <PackageName> was installed for a user,
but not provisioned for all users.
You may also see:
0x80073cf2This is a common Sysprep AppX error. The problem is usually a mismatch between an installed package and its provisioned state.
Microsoft explains the issue in its Sysprep and Microsoft Store app troubleshooting guide.
2. Prepare the Reference Image
Before removing packages, make sure you are working on a dedicated reference PC or virtual machine.
- Create a VM checkpoint or full backup.
- Close Microsoft Store and Store apps.
- Finish pending Windows updates.
- Restart after software installation.
- Keep unnecessary user profiles off the reference PC.
- Do not use broad cleanup on a production endpoint.
During final image preparation, avoid unnecessary Microsoft Store activity. This reduces the chance of package states changing before Sysprep runs.
3. Confirm the Error in the Sysprep Logs
Before removing anything, confirm that the failure is AppX-related.
Check:
%WINDIR%\System32\Sysprep\Panther\setuperr.log
%WINDIR%\System32\Sysprep\Panther\setupact.log
Display the latest entries with PowerShell:
Get-Content "$env:WINDIR\System32\Sysprep\Panther\setuperr.log" -Tail 50

Get-Content "$env:WINDIR\System32\Sysprep\Panther\setupact.log" -Tail 100
Look for a package name, AppX deployment message, or error
0x80073cf2.
If the log names one specific package, use targeted removal later in this guide.
4. Remove Installed AppX Packages
If broad cleanup is appropriate for the reference image, open PowerShell as Administrator.
To remove AppX packages with PowerShell for existing users, run:
Get-AppxPackage -AllUsers | Remove-AppxPackageAllow the command to finish before continuing.
Some protected or system-managed packages may remain. A removal error for one component does not mean every package failed.
See Microsoft’s Remove-AppxPackage documentation for command details.
5. Remove Provisioned AppX Packages
Installed and provisioned packages are different.
Provisioned packages are stored in the Windows image. They can be registered automatically when a new user profile is created.
To remove provisioned AppX packages, run:
Get-AppxProvisionedPackage -Online | Remove-AppxProvisionedPackage -OnlineThis removes the returned provisioned packages from the online Windows image.
See Microsoft’s Remove-AppxProvisionedPackage documentation.
6. Verify the Cleanup
Do not assume every package was removed.
Check installed packages:
Get-AppxPackage -AllUsers |
Select-Object Name, PackageFullName, PackageUserInformation
Then check provisioned packages:
Get-AppxProvisionedPackage -Online |
Select-Object DisplayName, PackageName
The results do not need to be empty. Windows can retain protected frameworks and system-managed components.
Restart the reference computer:
Restart-Computer7. Run Sysprep Again
After the restart, review the newest Panther log entries.
Then open Command Prompt as Administrator and run:
%WINDIR%\System32\Sysprep\Sysprep.exe /generalize /oobe /shutdownFor the complete workflow, read the SupportSolved guide to running Sysprep before imaging.
8. Remove Only the Package Named in the Log
If Sysprep identifies one package, targeted removal is safer than clearing the full AppX inventory.
Find the installed package:
Get-AppxPackage -AllUsers |
Where-Object Name -Like "*PackageName*"
Check whether it is also provisioned:
Get-AppxProvisionedPackage -Online |
Where-Object DisplayName -Like "*PackageName*"
Replace PackageName with the package reported in
setupact.log or
setuperr.log.
9. Prevent Sysprep AppX Errors from Returning
- Build the reference image in a controlled environment.
- Use Audit Mode when appropriate.
- Avoid unnecessary Microsoft Store activity before Sysprep.
- Limit extra user profiles on the reference PC.
- Finish Windows updates before the final Sysprep run.
- Restart after application installation.
- Create a checkpoint immediately before generalization.
If Sysprep fails again, review the newest logs. A different package or a non-AppX component may now be responsible.
Frequently Asked Questions
Can Microsoft Store apps cause Sysprep to fail?
Yes. A mismatch between a user-installed AppX package and its provisioned state can cause validation to fail.
What is the difference between installed and provisioned AppX packages?
Installed packages are registered for existing users. Provisioned packages are stored in the Windows image and can be registered for new profiles.
Should I use broad AppX removal on my normal PC?
No. Broad cleanup in this guide is intended for a controlled reference image. On a normal endpoint, identify and troubleshoot the specific package.
Why do some AppX packages remain?
Windows protects some framework and system-managed packages. The goal is to fix the package mismatch that blocks Sysprep, not to produce an empty AppX list.
Why does Sysprep still fail after cleanup?
Check the newest Panther logs. Another AppX package, a pending servicing operation, or another Windows component may now be causing the failure.
Summary
For an AppX-related Sysprep failure, confirm the problem in the Panther logs first.
If broad cleanup is appropriate, remove installed and provisioned packages, verify the remaining package state, and restart Windows.
Then run:
%WINDIR%\System32\Sysprep\Sysprep.exe /generalize /oobe /shutdownIf only one package appears in the logs, use targeted removal instead of broad cleanup.
For more Windows deployment and troubleshooting articles, visit the SupportSolved Windows guides.
