
You can edit Windows hosts file entries to override name resolution on one computer. This is useful when testing a website on a new server, working with a local development address, or temporarily directing a hostname to a specific IP address.
The safe method is to back up the existing file, open it with administrator rights, add one correctly formatted mapping per line, save it without a file extension, and clear the Windows DNS cache.
Quick Answer
- Open Windows Terminal as Administrator.
- Create a backup of the hosts file.
- Open the original file in Notepad.
- Add the required IP address and hostname.
- Save the file without adding a file extension.
- Flush the Windows DNS cache.
- Test the hostname from Command Prompt or PowerShell.
Create a backup with elevated PowerShell:
$hosts = "$env:WINDIR\System32\drivers\etc\hosts"
$backup = Join-Path ([Environment]::GetFolderPath("Desktop")) "hosts.backup"

Copy-Item $hosts $backup -Force
Open the hosts file in elevated Notepad:
notepad "$env:WINDIR\System32\drivers\etc\hosts"Example entry:
192.168.1.50 dev.example.testSave the file and clear the DNS client cache:
ipconfig /flushdnsTest the new mapping:
ping dev.example.testVideo: How to Edit Windows Hosts File Safely
The video below shows how to back up the hosts file, open it with administrator rights, add a mapping, flush the DNS cache, test the result, and restore the original file.
1. What the Windows Hosts File Does
The hosts file is a local text file that maps a hostname to an IPv4 or IPv6 address. When Windows finds a matching entry, it can use that address instead of asking the configured DNS server.
Common uses include testing a website on a replacement server, assigning a local development hostname, temporarily redirecting an internal name, and blocking a specific hostname on one computer.
2. Find the Windows Hosts File
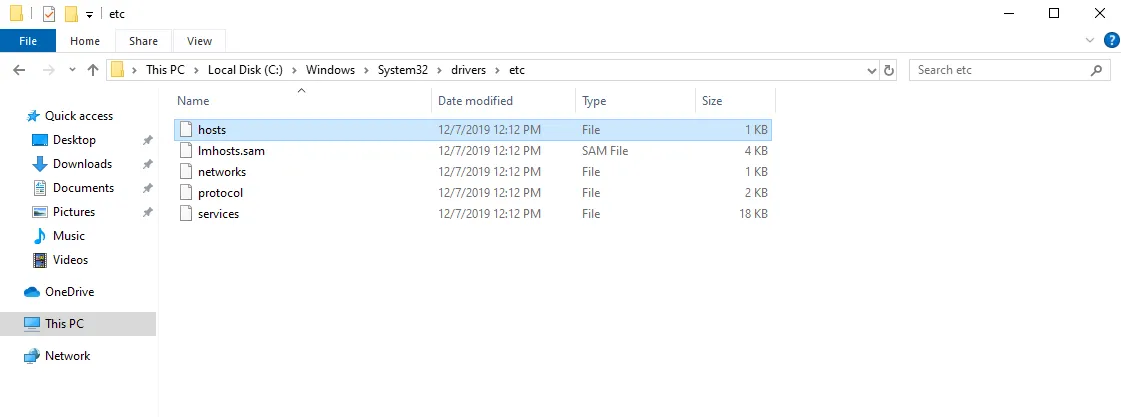
The standard path is:
C:\Windows\System32\drivers\etc\hostsThe file name is exactly hosts and normally has no .txt extension.
Press Win + R and open:
%WINDIR%\System32\drivers\etc3. Back Up the Original File
Open Windows Terminal as Administrator and run:
$hosts = "$env:WINDIR\System32\drivers\etc\hosts"
$backup = Join-Path ([Environment]::GetFolderPath("Desktop")) "hosts.backup"

Copy-Item $hosts $backup -Force
Confirm that hosts.backup appears on the desktop. A manual copy is also acceptable as long as it is stored outside the original folder.
4. How to Edit Windows Hosts File Safely
The quickest method is to open Windows Terminal as Administrator and run:
notepad "$env:WINDIR\System32\drivers\etc\hosts"You can also start Notepad with Run as administrator, choose File → Open, browse to the folder, change the file filter to All Files, and open hosts.
I prefer opening the existing file directly from an elevated terminal because it avoids accidentally creating hosts.txt.
5. Use the Correct Entry Format
Place the IP address first and the hostname second:
192.168.1.50 dev.example.test- Use one mapping per line.
- Separate the IP address and hostname with spaces or a tab.
- Use
#for comments. - Do not include
http://,https://, paths, or port numbers.
6. Map a Domain to Another IP Address
To direct a test hostname to 192.168.1.50, add:
192.168.1.50 dev.example.testUse separate entries for different hostnames:
192.168.1.50    example.test
192.168.1.50 www.example.test7. Block a Hostname Locally
To stop one computer from reaching a hostname through its normal public address, map each required hostname to a local or non-routable address:
0.0.0.0    example.com
0.0.0.0    www.example.com
This is a simple local restriction, not a replacement for firewall rules, DNS filtering, endpoint security, or centrally managed policies.
8. Flush DNS and Test the Entry
After you edit Windows hosts file entries and save the file, clear the Windows DNS client cache:
ipconfig /flushdnsThen test the hostname:
ping dev.example.testThe first line should show the IP address from the hosts file. The mapping can still be correct even when the destination blocks ping.
For an HTTP service, test with:
curl.exe -I http://dev.example.testFor more DNS commands, see Clear DNS Cache on Windows and macOS.
9. Fix Save and Permission Errors
- Access denied: reopen Notepad or Windows Terminal with administrator rights.
- Saved as hosts.txt: enable file-name extensions and rename the file to
hosts. - Notepad creates a new file: open the existing file directly with the elevated command.
- Security software blocks the change: do not disable protection. Confirm the entry is legitimate and follow the approved exception process.
Microsoft documents the elevated-editor method in its hosts file access-denied guide.
10. Fix a Hosts Entry That Does Not Work
| Problem | What to Check |
|---|---|
| Wrong file name or location | Confirm the file is named hosts inside %WINDIR%\System32\drivers\etc. |
| Incorrect entry format | Place the IP address first, hostname second, and remove a leading #. |
| Different hostname | Add separate entries for the root domain, www, or other required subdomains. |
| Old cached result | Flush DNS, close the browser or application, and test again. |
| HTTPS warning | Confirm that the destination server has a valid certificate for the requested hostname. |
| VPN or proxy changes the route | Check active VPN, proxy, secure web gateway, or managed-browser settings. |
11. Restore the Original Hosts File
To restore the desktop backup, open Windows Terminal as Administrator and run:
$hosts = "$env:WINDIR\System32\drivers\etc\hosts"
$backup = Join-Path ([Environment]::GetFolderPath("Desktop")) "hosts.backup"

Copy-Item $backup $hosts -Force
ipconfig /flushdns
For one temporary mapping, delete only that line, save the file, and flush DNS again. If the backup is unavailable, follow Microsoft’s official hosts-file reset procedure.
Frequently Asked Questions
Where is the Windows hosts file?
The default path is C:\Windows\System32\drivers\etc\hosts. The file normally has no extension.
Can I edit Windows hosts file with Notepad?
Yes. Open Notepad with Run as administrator, then open the existing hosts file from C:\Windows\System32\drivers\etc. Saving without administrator rights usually causes an access-denied error.
Do I need to restart Windows?
Usually no. Save the file, run ipconfig /flushdns, and restart the affected browser or application.
Can the hosts file redirect an HTTPS website?
It can map the hostname to another IP address, but the destination server must still present a valid TLS certificate for that hostname.
Does editing the hosts file change public DNS?
No. It creates a local mapping on the edited Windows computer only.
Summary
To edit Windows hosts file safely, back up the existing file and open it with administrator rights:
notepad "$env:WINDIR\System32\drivers\etc\hosts"Use the IP address followed by the hostname:
192.168.1.50 dev.example.testAfter saving, run:
ipconfig /flushdnsTest the mapping and remove temporary entries when the migration, development, or troubleshooting task is complete.
For more Windows networking and troubleshooting articles, visit the SupportSolved Windows guides.
