
To run Sysprep on Windows before imaging, prepare a clean reference PC, complete your approved changes, and then generalize the installation before capturing it.
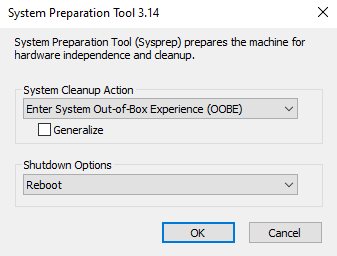
For a standard deployment image, use Sysprep with the Generalize, OOBE, and Shutdown options. After the computer shuts down, boot directly into WinPE or your approved capture environment.
The most important part is preparation. A pending update, Microsoft Store package problem, or unfinished installation can cause Sysprep to fail.
Quick Answer
Open Command Prompt as administrator and run:
%WINDIR%\System32\Sysprep\Sysprep.exe /generalize /oobe /shutdownThis command:
- Generalizes the Windows installation.
- Prepares the next normal boot for OOBE.
- Shuts down the reference computer when Sysprep finishes.
After shutdown, do not start the installed Windows environment again. Boot into WinPE or your capture system and create the image from there.
Video: Run Sysprep Before Capturing a Windows Image
The video below shows the basic preparation, Sysprep command, and shutdown process before image capture.
1. What Does Sysprep Do?
Sysprep prepares a Windows installation so it can be captured and deployed to other computers.
Sysprep does not create the image itself. A separate tool such as DISM or a deployment platform captures the image after Windows has been generalized.
The /generalize option removes or resets computer-specific information from the reference installation.
The destination computer can then complete its own hardware detection, specialize stage, and OOBE process after deployment.
See Microsoft’s official Sysprep overview for current requirements and limitations.
2. Prepare a Clean Reference PC
For Sysprep before imaging, start with a clean Windows installation or a dedicated reference virtual machine.
The reference system should contain only the applications, updates, drivers, and settings that belong in the final image.
Before you continue:
- Install approved Windows updates.
- Install required applications.
- Install only the drivers needed for the reference build.
- Remove temporary installers and test files.
- Remove personal accounts and saved credentials.
- Keep the reference system out of normal user use.
- Create a VM checkpoint or backup.
A dedicated VM is easier to rebuild and keeps personal data away from the deployment image.
3. Use Windows Audit Mode
Audit Mode lets you configure Windows before a normal user completes OOBE.
At the first OOBE screen, press:
Ctrl + Shift + F3Windows restarts and signs in with the built-in Administrator account.
You can then install applications, drivers, updates, and approved configuration changes.
Do not run the final Sysprep command until the reference build has been fully tested.
4. Check Windows Before Running Sysprep
Before the final command, complete these checks:
- Restart Windows after installing software and updates.
- Make sure no installation is still running.
- Confirm that Windows Update has finished.
- Test the applications included in the image.
- Remove temporary files and installers.
- Check that no personal credentials remain.
- Create a final VM checkpoint.
Do not remove every Microsoft Store package just because Sysprep may fail.
Run Sysprep first. If validation fails, use the logs to identify the exact package or component.
5. How to Run Sysprep on Windows
Open Command Prompt as administrator.
Run:
%WINDIR%\System32\Sysprep\Sysprep.exe /generalize /oobe /shutdownThis is the standard Sysprep Generalize OOBE Shutdown workflow for a reusable Windows image.
| Option | Purpose |
|---|---|
/generalize |
Removes or resets computer-specific information. |
/oobe |
Starts OOBE on the next normal Windows boot. |
/shutdown |
Shuts down the reference PC when Sysprep finishes. |
Microsoft documents the current options in the Sysprep command-line reference.
6. What to Do After Sysprep Shuts Down
When Sysprep finishes, the reference computer shuts down.
Do not boot the installed Windows environment again before image capture.
Instead, boot into:
- Windows PE
- Your approved imaging environment
- A Configuration Manager capture workflow
- Another supported deployment platform
A normal Windows boot starts the specialize and OOBE process. If this happens before capture, restore your pre-Sysprep checkpoint and prepare the image again.
7. Check Sysprep Logs After a Failure
If Sysprep fails, do not keep running the same command.
Check these files:
%WINDIR%\System32\Sysprep\Panther\setuperr.log
%WINDIR%\System32\Sysprep\Panther\setupact.log
Start with setuperr.log. Find the newest error code, package, or component.
Then check setupact.log around the same time for more detail.
You can quickly view the latest error lines with PowerShell:
Get-Content "$env:WINDIR\System32\Sysprep\Panther\setuperr.log" -Tail 508. Fix a Sysprep AppX Error
One common Sysprep AppX error happens when a Microsoft Store package is installed for a user but is not correctly provisioned for all users.
The log may show a message similar to:
Package <PackageName> was installed for a user, but not provisioned for all users.
0x80073cf2
Identify the exact package first.
List installed AppX packages:
Get-AppxPackage -AllUsers | Select-Object Name, PackageFullName, PackageUserInformationList provisioned packages:
Get-AppxProvisionedPackage -Online | Select-Object DisplayName, PackageNameFollow Microsoft’s Sysprep AppX troubleshooting procedure for the affected package.
Frequently Asked Questions
What is the Sysprep command before imaging?
For a standard generalized image, use:
%WINDIR%\System32\Sysprep\Sysprep.exe /generalize /oobe /shutdownCan I boot Windows after Sysprep finishes?
Not before image capture. Boot into WinPE or your approved capture environment instead.
Why does Sysprep fail because of a Microsoft Store app?
A Store package may be installed or updated for one user while its provisioned state does not match the reference image. Check the package named in the Sysprep logs.
Should I use a physical PC or virtual machine?
A virtual machine is usually easier to manage because you can create checkpoints before major changes and before the final Sysprep run.
Summary
The safest way to run Sysprep on Windows is to start with a clean reference installation, finish your approved changes, and create a checkpoint before generalization.
Run:
%WINDIR%\System32\Sysprep\Sysprep.exe /generalize /oobe /shutdownAfter shutdown, boot directly into WinPE or your approved capture environment.
If Sysprep fails, check the Panther logs before changing Windows packages or trying again.
For more Windows deployment and troubleshooting articles, visit the SupportSolved Windows guides.
