Ultimate BitLocker on Windows Guide (2025) – Secure Your Data Like a Pro
BitLocker on Windows is Microsoft’s built-in full-disk encryption feature that keeps your data safe even if your device is lost or stolen. In this step-by-step 2025 guide, you will learn what BitLocker is, why you should use it, how to enable it safely, how to back up the recovery key, and which options to choose for the best protection.
Table of Contents
What Is BitLocker on Windows?
BitLocker on Windows is Microsoft’s full-disk encryption technology available in Windows Pro, Enterprise, and Education editions. It uses AES 128-bit or 256-bit encryption and works best with a Trusted Platform Module (TPM) chip to protect the data stored on your drives. In practice, BitLocker ensures that even if someone removes your drive and connects it to another PC, your files remain unreadable without the proper keys.
Why Use Drive Encryption
Turning on BitLocker on Windows is not only a security best practice but also a compliance requirement for many organizations. In addition, it helps you avoid data leaks from stolen or lost laptops.
- Prevents unauthorized access to confidential data on lost or stolen devices.
- Helps organizations meet compliance standards such as GDPR and HIPAA.
- Integrated directly into Windows—no third-party software required.
- Supports operating system and removable drives through BitLocker To Go.
How to Enable BitLocker on Windows (Windows 10/11)
Before you enable BitLocker on Windows, confirm that you are using a Windows edition that supports drive encryption. Then follow the steps below in order. This structured approach reduces the risk of lockouts and startup issues.
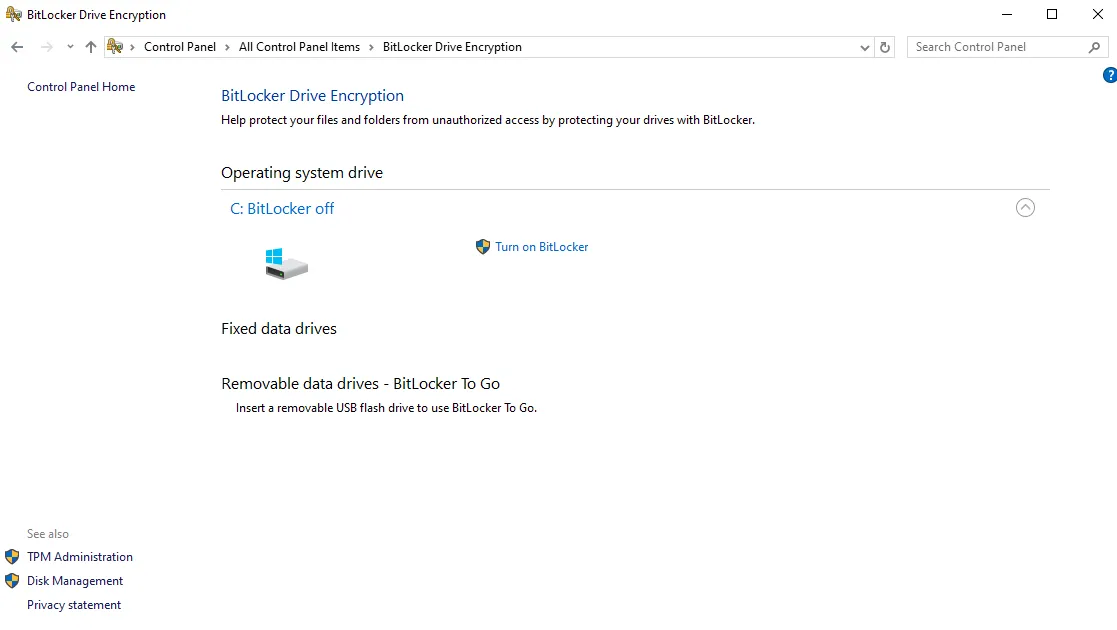
Step 1 — Open BitLocker Settings
First, open Control Panel → System and Security → BitLocker Drive Encryption, or search Manage BitLocker from the Start menu. This panel is the main control center for BitLocker on Windows.
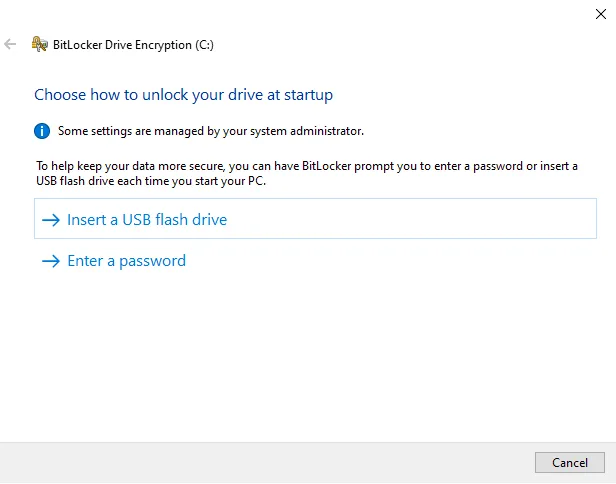
Step 2 — Choose Unlock Method
Next, decide how the system drive will unlock at startup. You can use a TPM + PIN, a password, or a USB key depending on your security policy. A TPM + PIN option is usually the most secure and still convenient for daily use.
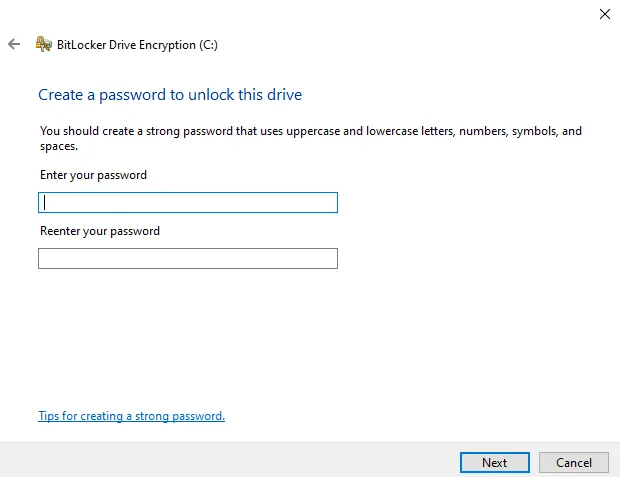
Step 3 — Create a Password
Then create a strong password with uppercase letters, lowercase letters, numbers, and symbols. Avoid reusing passwords from other accounts, since that increases the risk of compromise. A unique BitLocker password keeps your encrypted drive safer.
Step 4 — Back Up the Recovery Key
After that, back up your BitLocker Recovery Key in more than one place. You can save it to your Microsoft account, a USB flash drive, a secure password manager, or a printed document stored in a safe location. Do not keep the only copy on the encrypted computer. Otherwise, a hardware failure could lock you out permanently.

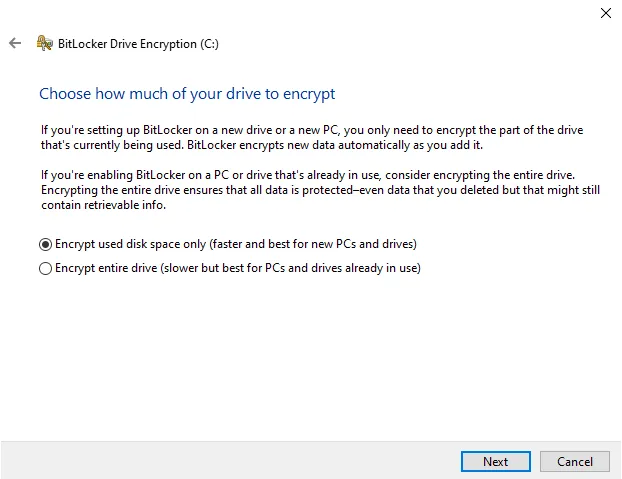
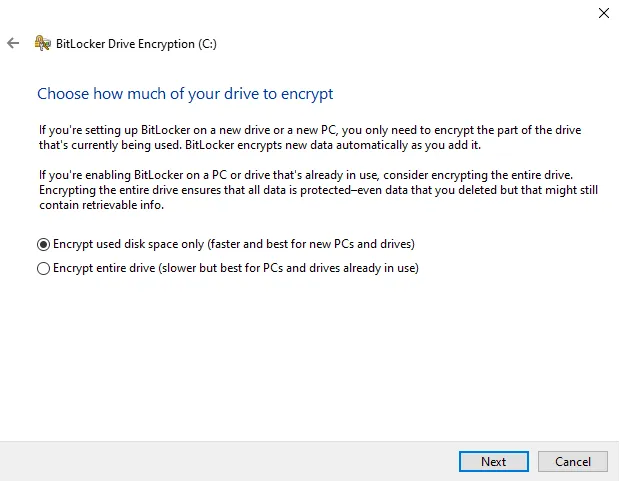
Step 5 — Choose How Much to Encrypt
Now decide how much of the drive you want to encrypt. Your choice impacts performance and initial encryption time.
- Encrypt used disk space only – faster, ideal for new PCs with little data.
- Encrypt the entire drive – recommended for existing systems with data.
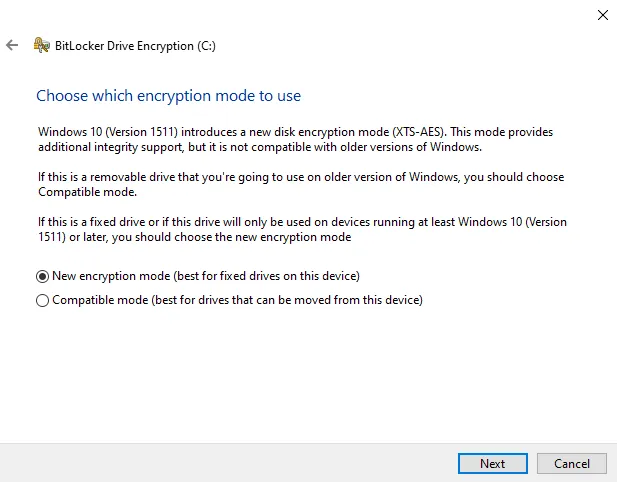
Step 6 — Select Encryption Mode
BitLocker on Windows offers two main encryption modes. Therefore, pick the one that matches how you use your drive.
- New XTS-AES mode – best for fixed internal drives on modern Windows systems.
- Compatible mode – for drives you plan to move to older Windows versions.
Step 7 — Ready to Encrypt
Before you start, you can optionally run the system check. This test confirms that your TPM, password, and recovery key all work correctly. As a result, it reduces the chance of startup problems after encryption begins.
Step 8 — Start Encryption
When you are ready, click Start Encrypting. BitLocker on Windows runs the process in the background, so you can usually keep working while encryption completes. However, large and slower disks will take more time.

Step 9 — Monitor Progress
The total time depends on drive size, speed, and the amount of data. You can monitor the status at any point by using the built-in command-line tool:
manage-bde -status
Pros and Cons
Like any security feature, BitLocker on Windows has advantages and trade-offs. Understanding both helps you decide whether to enable it on every device.
Pros: Integrated, reliable, and simple to manage for most users. It protects laptops, desktops, and removable drives without extra licensing. Cons: Not available in Windows Home editions, a small performance impact on older hardware, and losing the recovery key can mean permanent data loss.
Best BitLocker on Windows Practices & Commands
To keep BitLocker on Windows both secure and manageable in the long term, follow these best practices. They are especially important in business and education environments.
- Keep multiple copies of your recovery key in safe, separate locations.
- Use TPM + PIN for added pre-boot security on sensitive devices.
- Temporarily suspend protection before BIOS or firmware updates:
manage-bde -protectors -disable C: -RebootCount 1 - Re-enable protection after updates:
manage-bde -protectors -enable C: - Check current status anytime with:
manage-bde -status
Helpful Resources
For more technical details and official recommendations about BitLocker on Windows, review the resources below.
Conclusion: Is BitLocker on Windows Worth It?
Drive encryption is one of the most effective defenses against unauthorized data access. With a TPM, strong password policies, and a safely stored recovery key, BitLocker on Windows keeps your system protected even if the device is lost, stolen, or recycled. For most Windows Pro, Enterprise, and Education users, enabling BitLocker is a smart and low-maintenance upgrade to overall security.
For more Windows security tutorials, visit SupportSolved.
Meta: BitLocker on Windows full-disk encryption guide for 2025. Learn what BitLocker is, how to enable it, back up the recovery key, and apply best practices.