
You can install WordPress on XAMPP in Windows to create a complete local WordPress environment for development, testing, learning, or troubleshooting without using a live hosting account. XAMPP provides Apache, MySQL, PHP, and phpMyAdmin, which are the main components required to run WordPress locally.
Quick Answer
To install WordPress on XAMPP in Windows, follow these 10 steps:
- Download XAMPP for Windows.
- Select the required XAMPP components.
- Install XAMPP.
- Finish the XAMPP setup.
- Start Apache and MySQL.
- Download WordPress.
- Copy the WordPress files into the XAMPP htdocs folder.
- Create a WordPress database in phpMyAdmin.
- Enter the WordPress database details.
- Complete the installation and open the WordPress dashboard.
Video: How to Install WordPress on XAMPP
The video below shows the complete process to install WordPress on XAMPP, from downloading XAMPP and WordPress to creating the database and opening the WordPress dashboard.
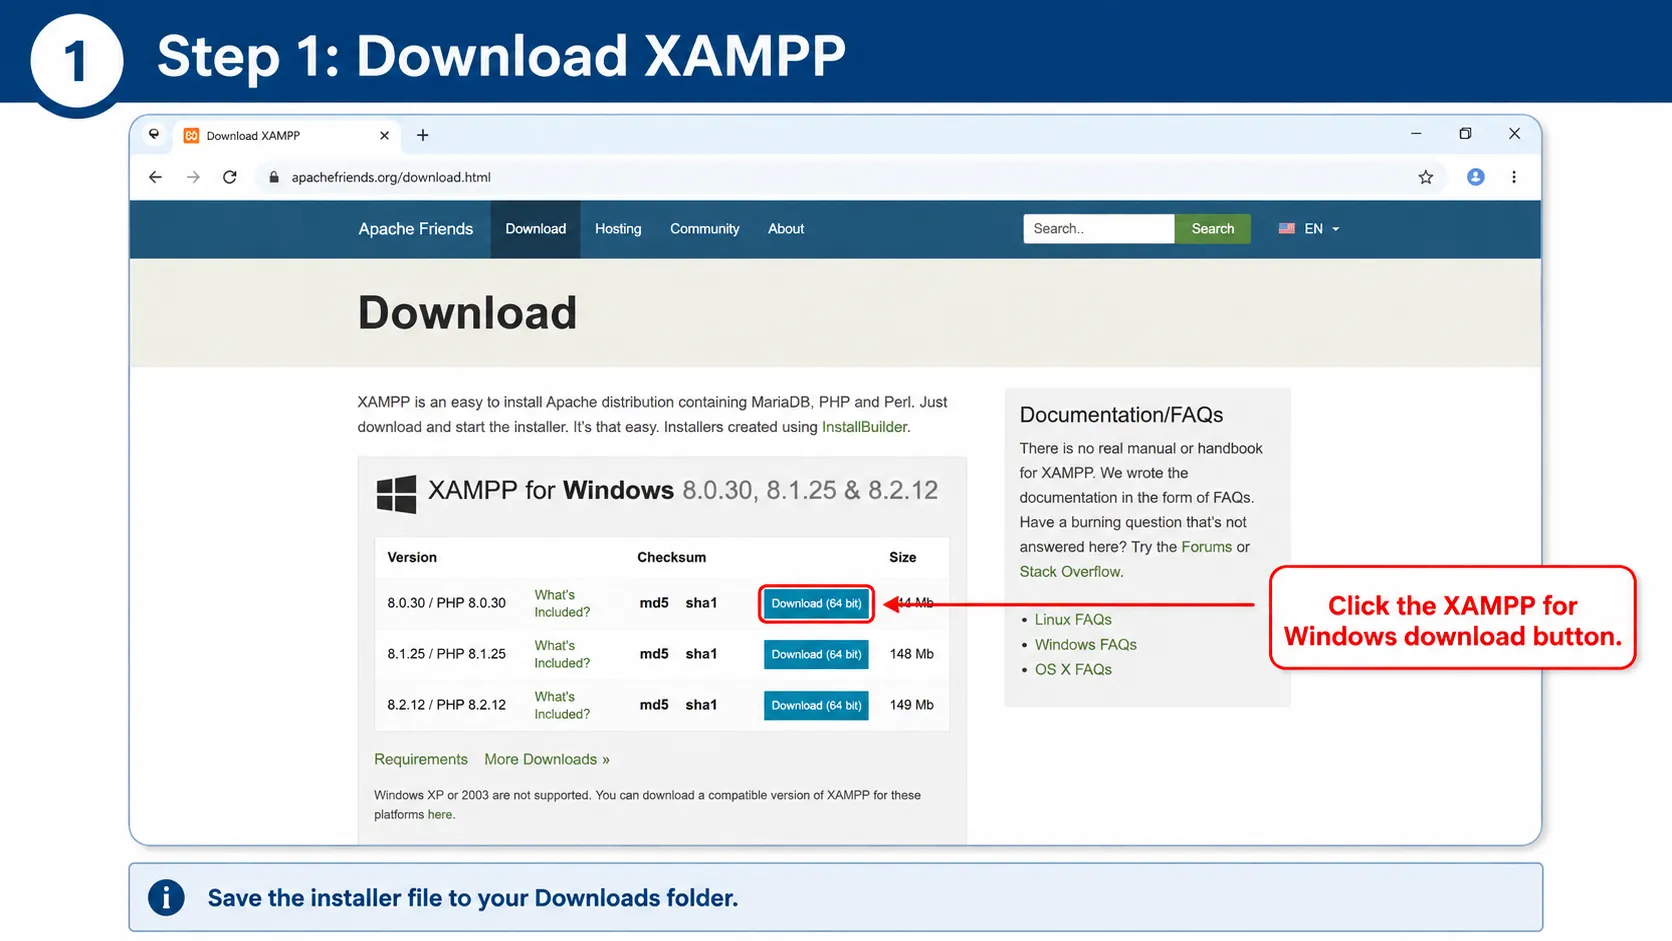
Step 1: Download XAMPP for Windows
Start by opening the official Apache Friends website and downloading the latest XAMPP version available for Windows.
Step 2: Select the XAMPP Components
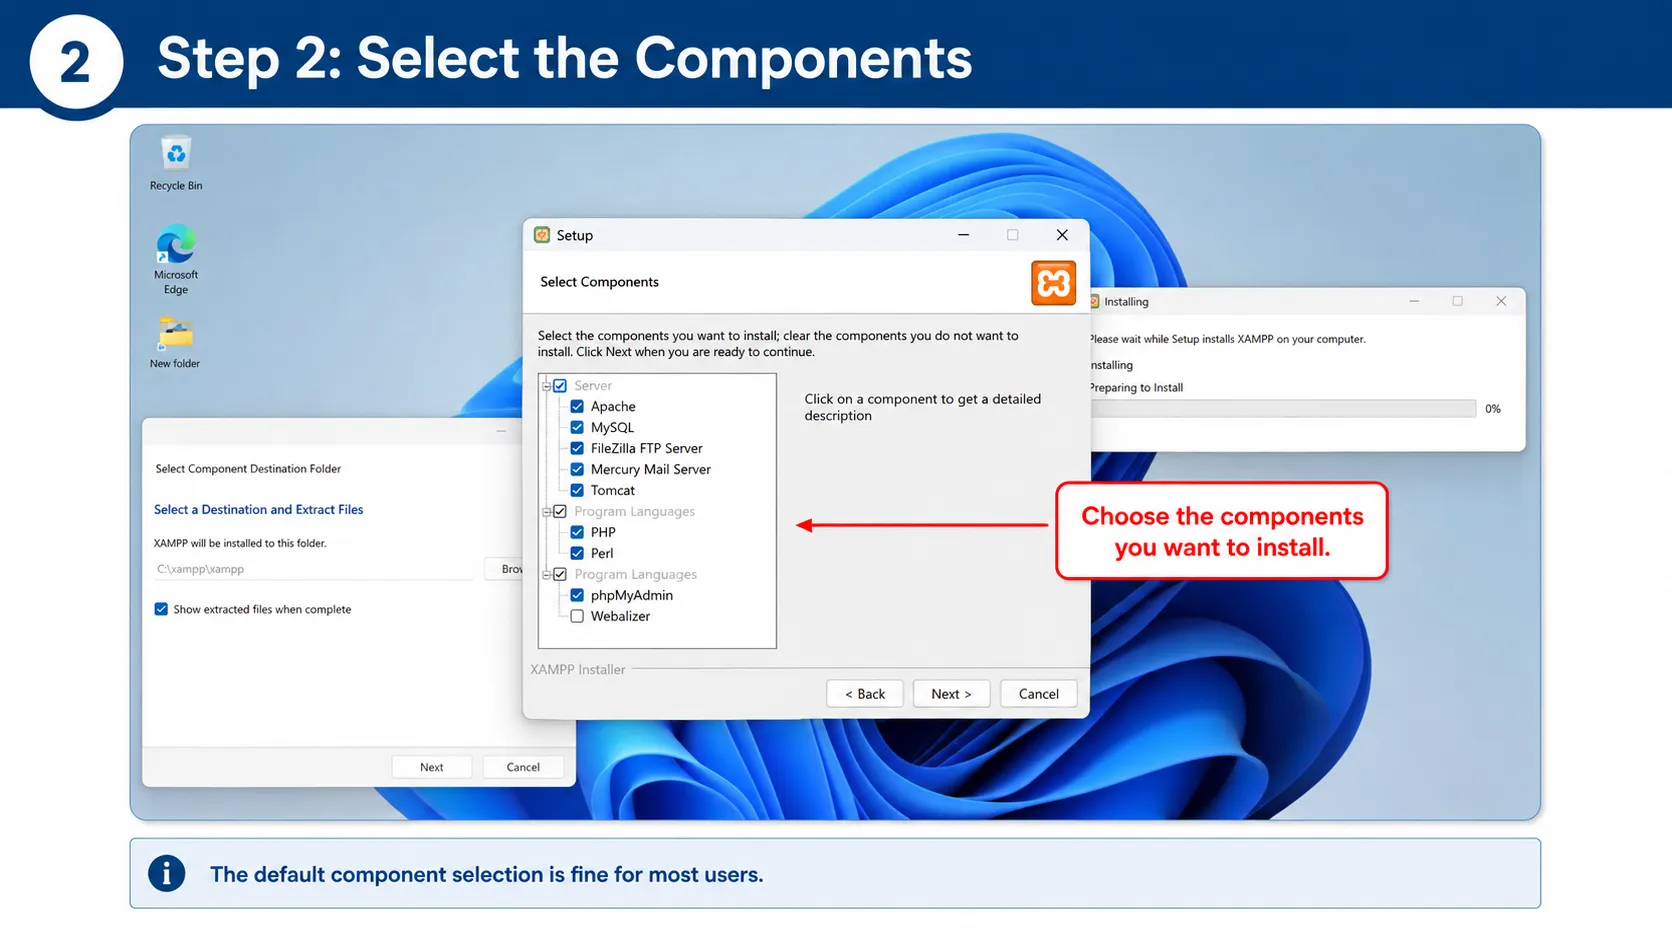
Run the XAMPP installer. When the component selection screen appears, the default selection is normally suitable for a local WordPress installation.
The main components required to install WordPress on XAMPP are Apache, MySQL, PHP, and phpMyAdmin.
Step 3: Install XAMPP
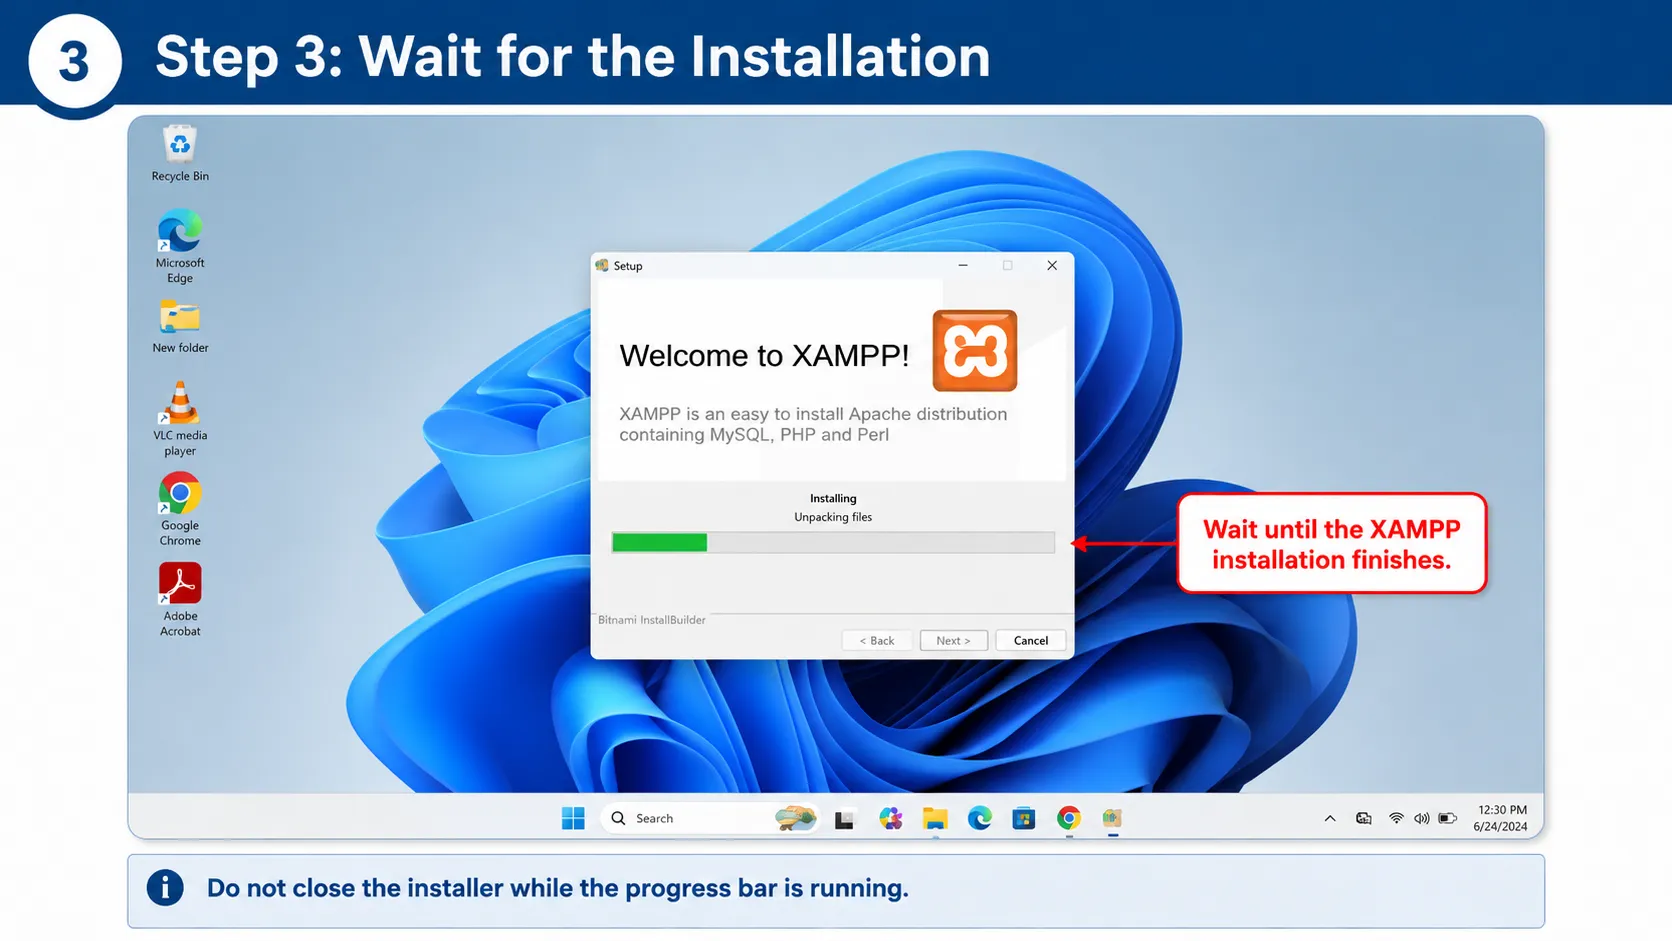
Continue through the setup wizard and allow XAMPP to install the selected components.
Do not close the installer while the installation progress bar is running.
Step 4: Finish the XAMPP Setup
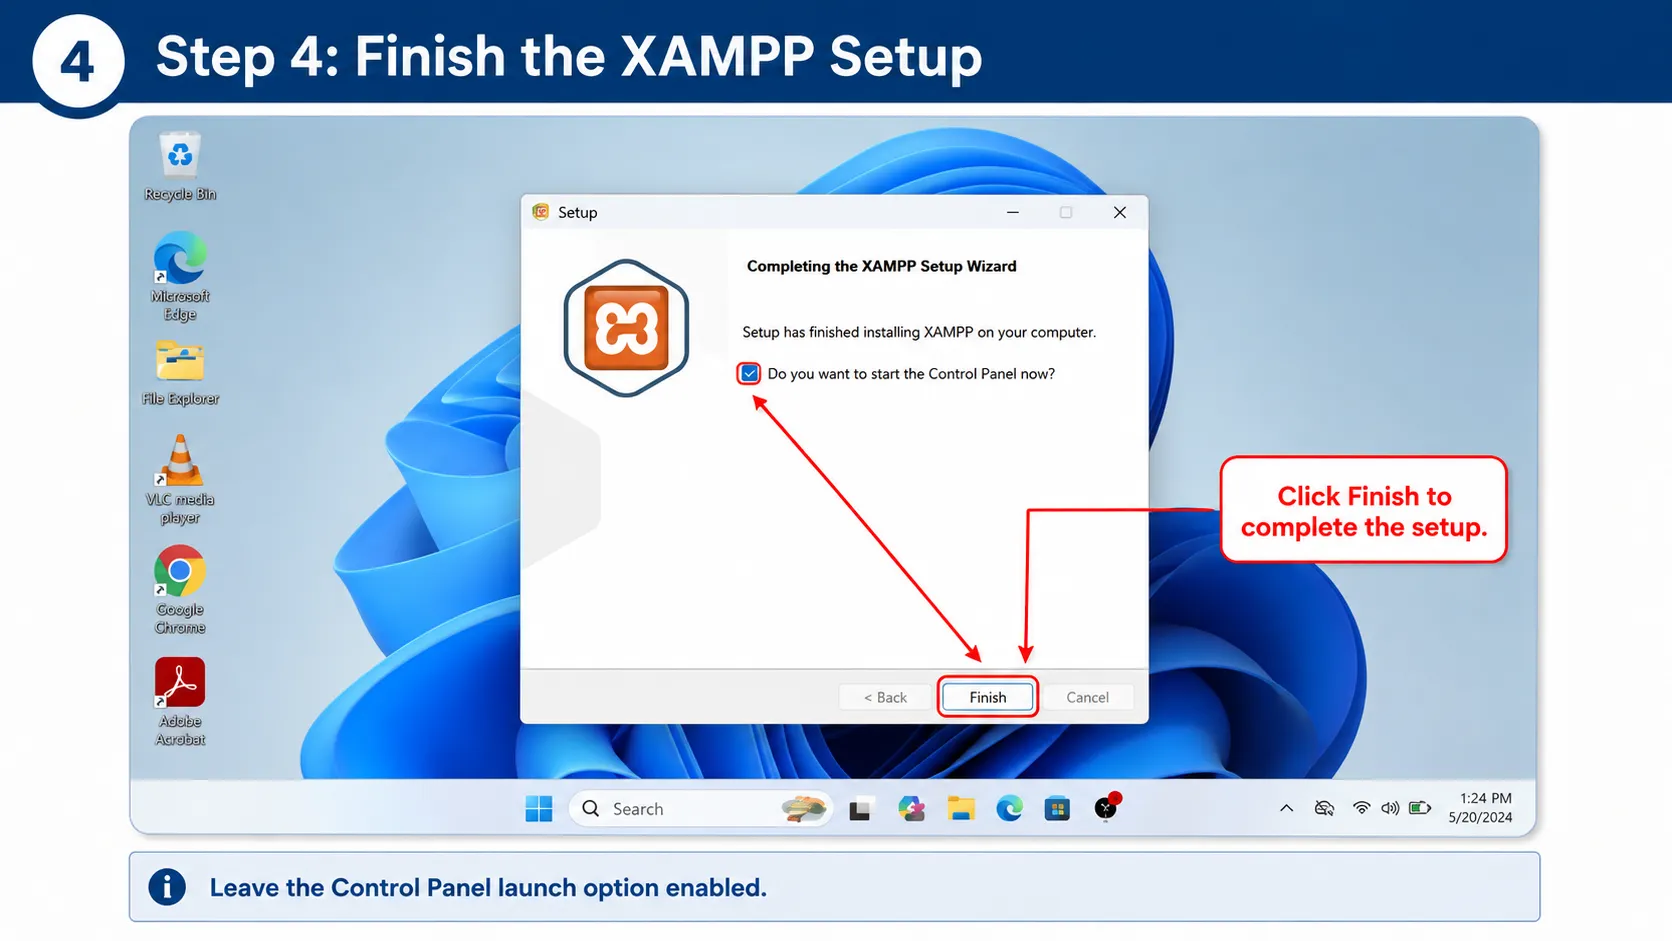
When the installation is complete, leave the option to start the XAMPP Control Panel enabled and click Finish.
Step 5: Start Apache and MySQL
Open the XAMPP Control Panel and click Start next to Apache and MySQL.
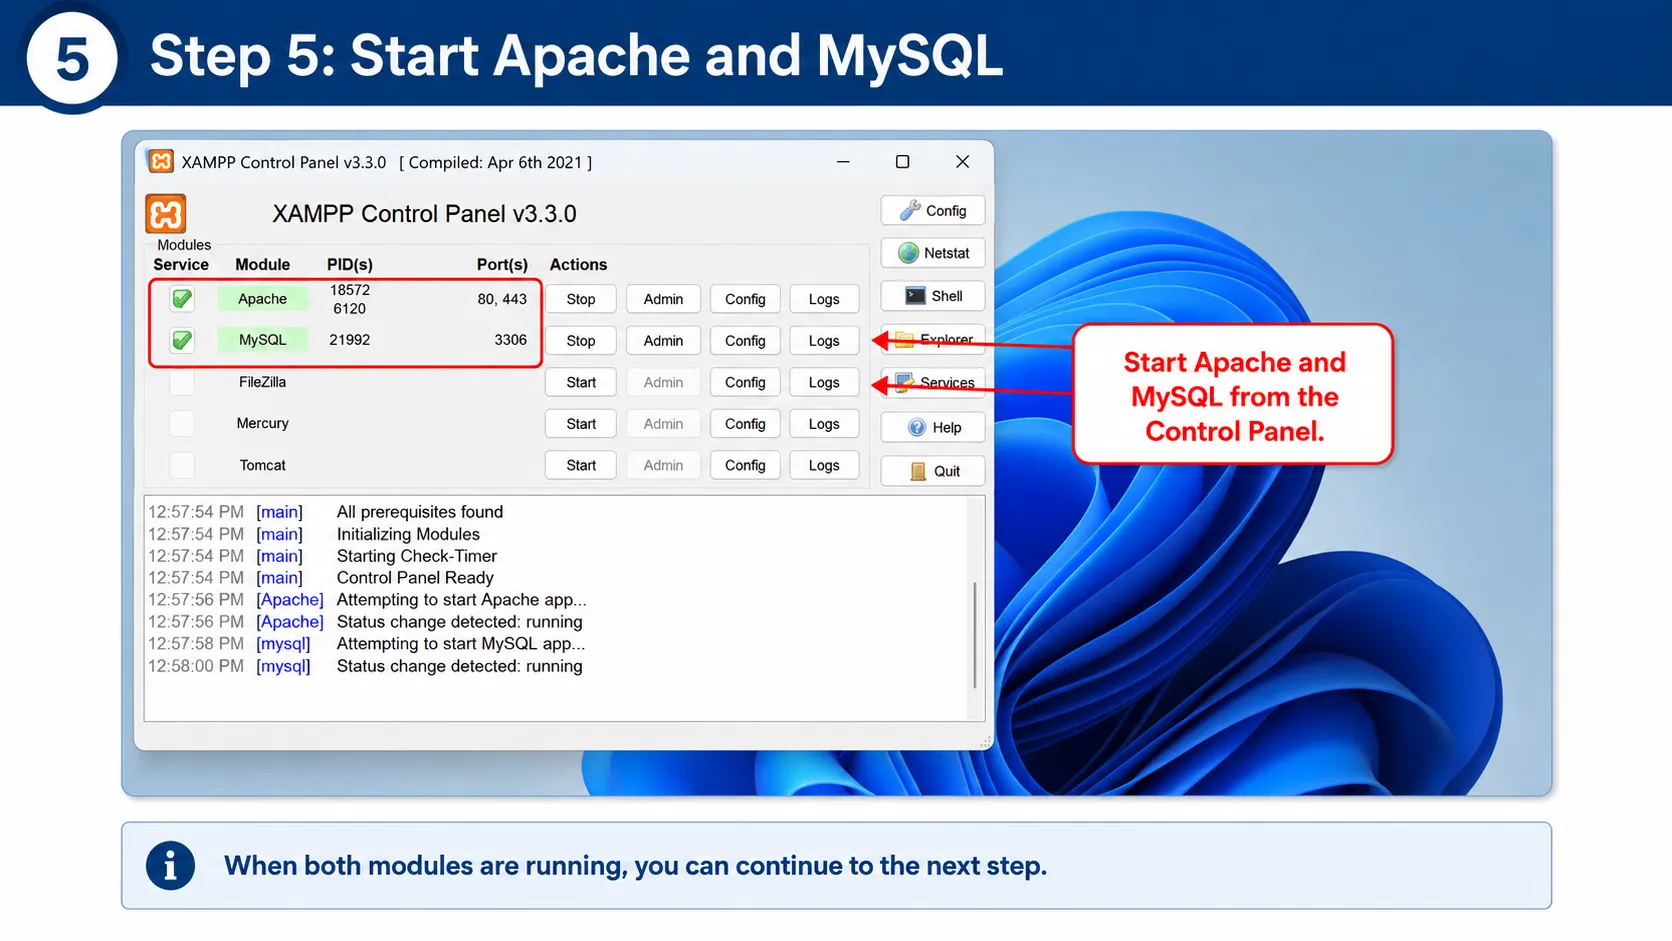
Apache serves your local WordPress files, while MySQL stores the WordPress database. Both services should be running before you continue.
Step 6: Download WordPress
Open the official WordPress download page and download the latest WordPress ZIP package.
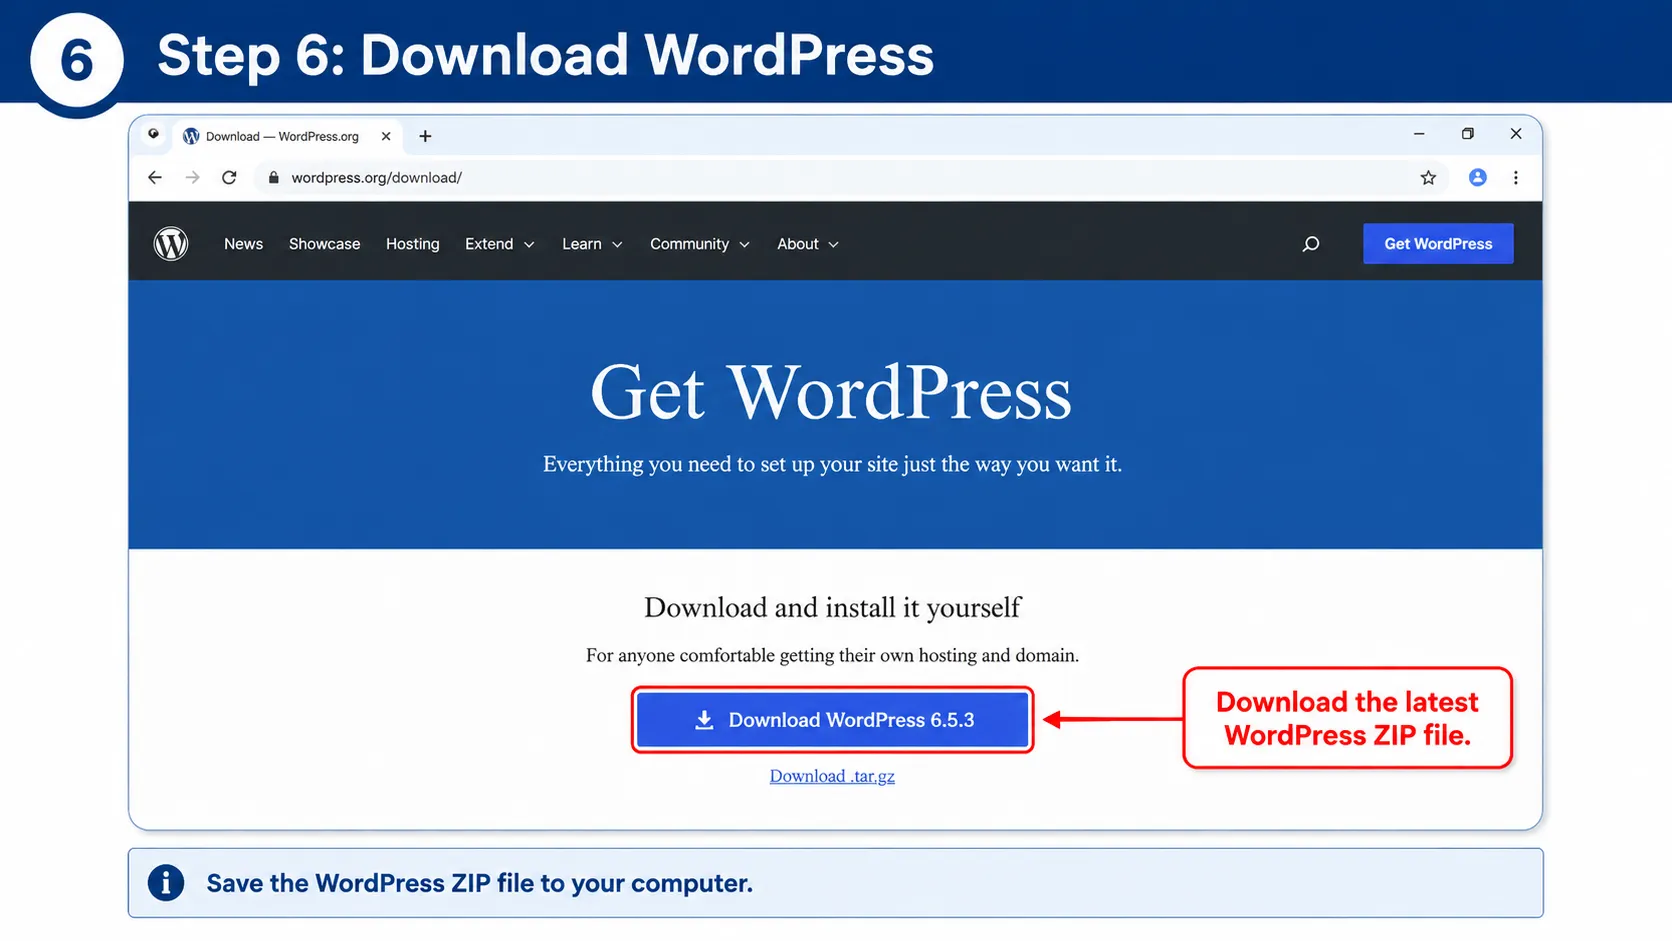
After the download finishes, extract the WordPress ZIP file.
Step 7: Copy the WordPress Files to XAMPP
To continue the process to install WordPress on XAMPP, open the XAMPP web root directory:
C:\xampp\htdocsCreate a new folder for your local WordPress website. In this guide, the folder is:
wordpress-testCopy all files from the extracted WordPress folder into:
C:\xampp\htdocs\wordpress-test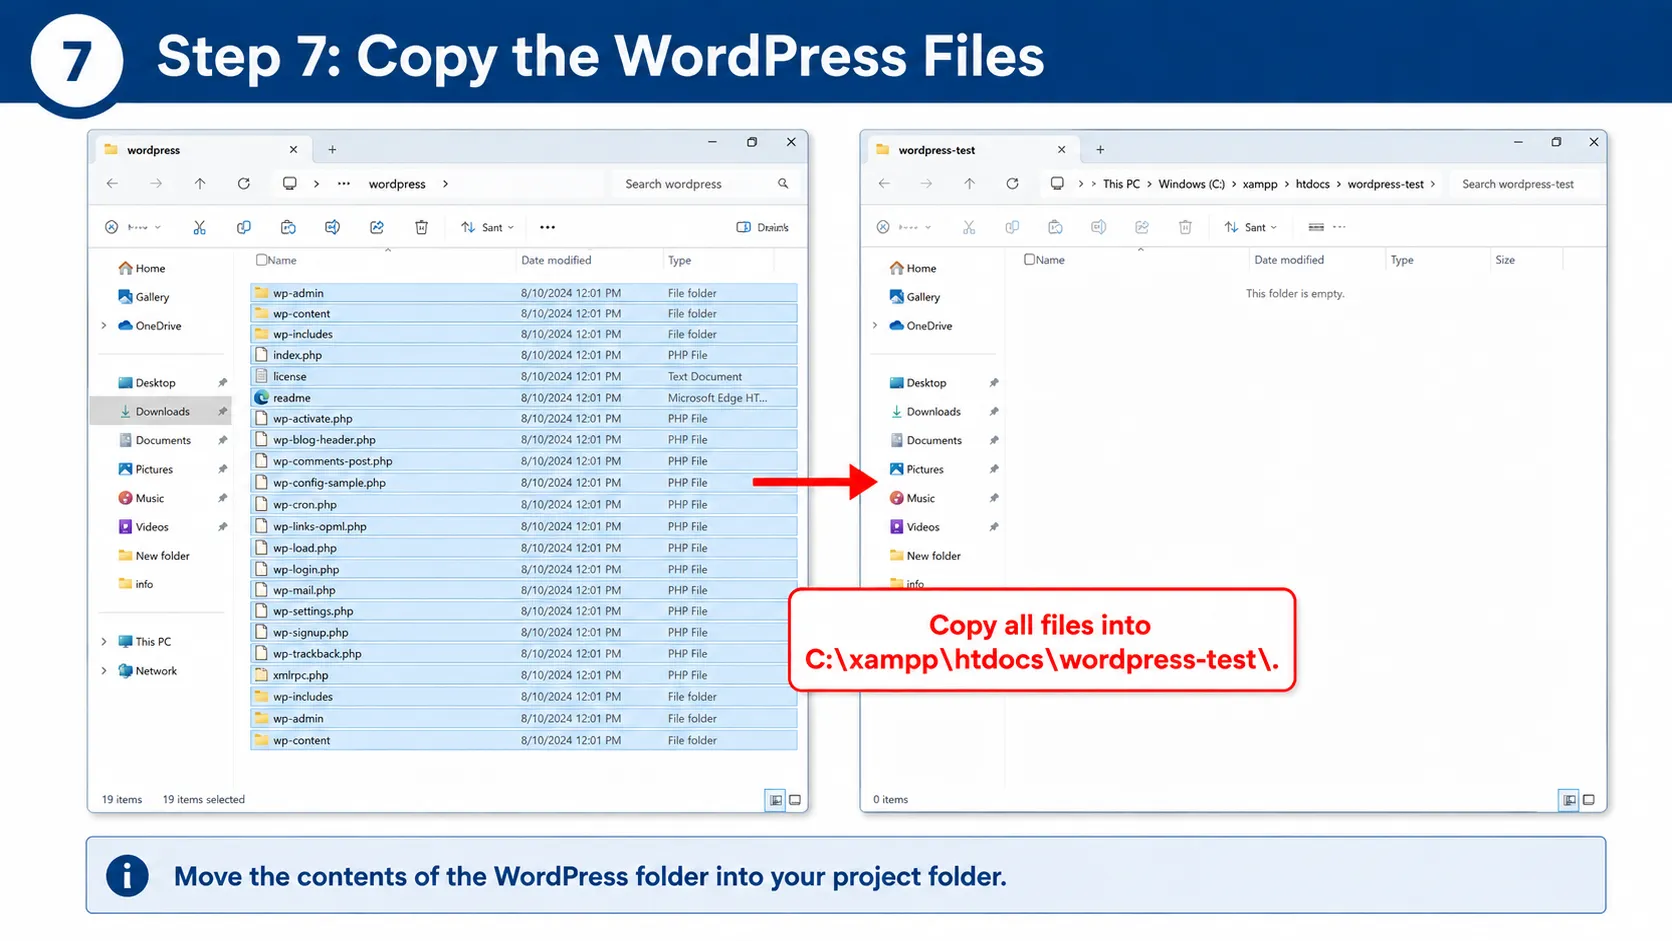
The wp-admin,
wp-content,
wp-includes,
and other WordPress files should be directly inside the
wordpress-test folder.
Step 8: Create a WordPress Database
Open your browser and go to:
http://localhost/phpmyadmin/Open the Databases section in phpMyAdmin. Enter a database name and click Create.
For this example, use:
wordpress_test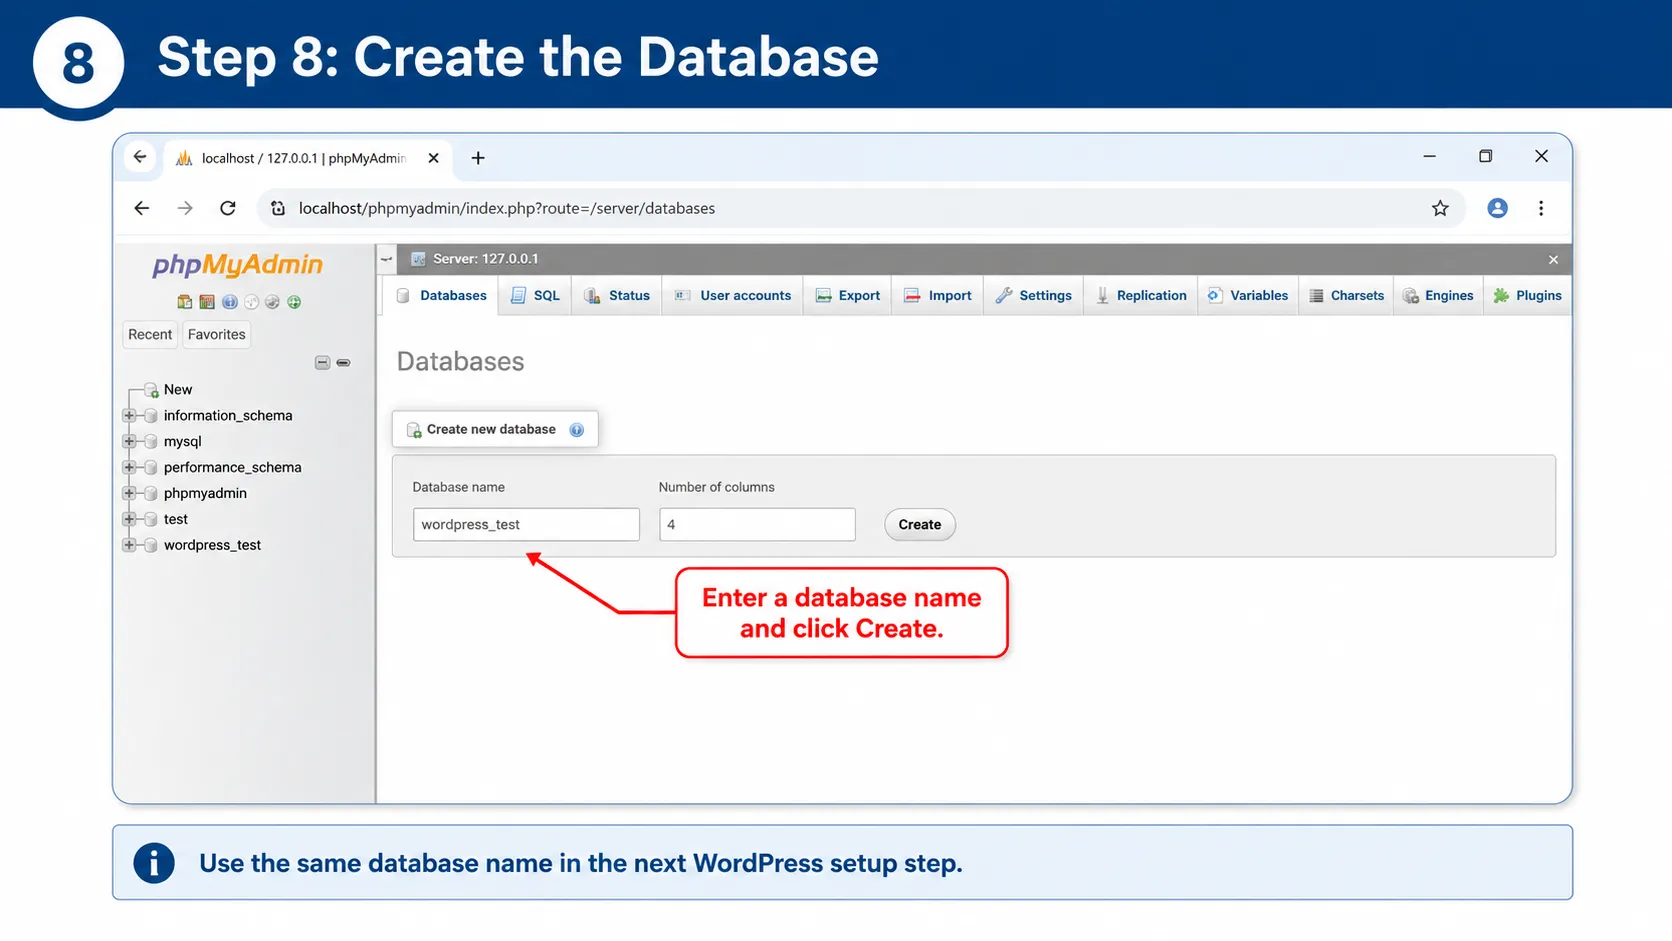
You only need to create the empty database. WordPress will create the required tables automatically during the installation.
Step 9: Enter the WordPress Database Details
Open your local WordPress website:
http://localhost/wordpress-test/Continue until WordPress asks for the database connection information.
- Database Name: wordpress_test
- Username: root
- Password: leave blank
- Database Host: localhost
- Table Prefix: wp_
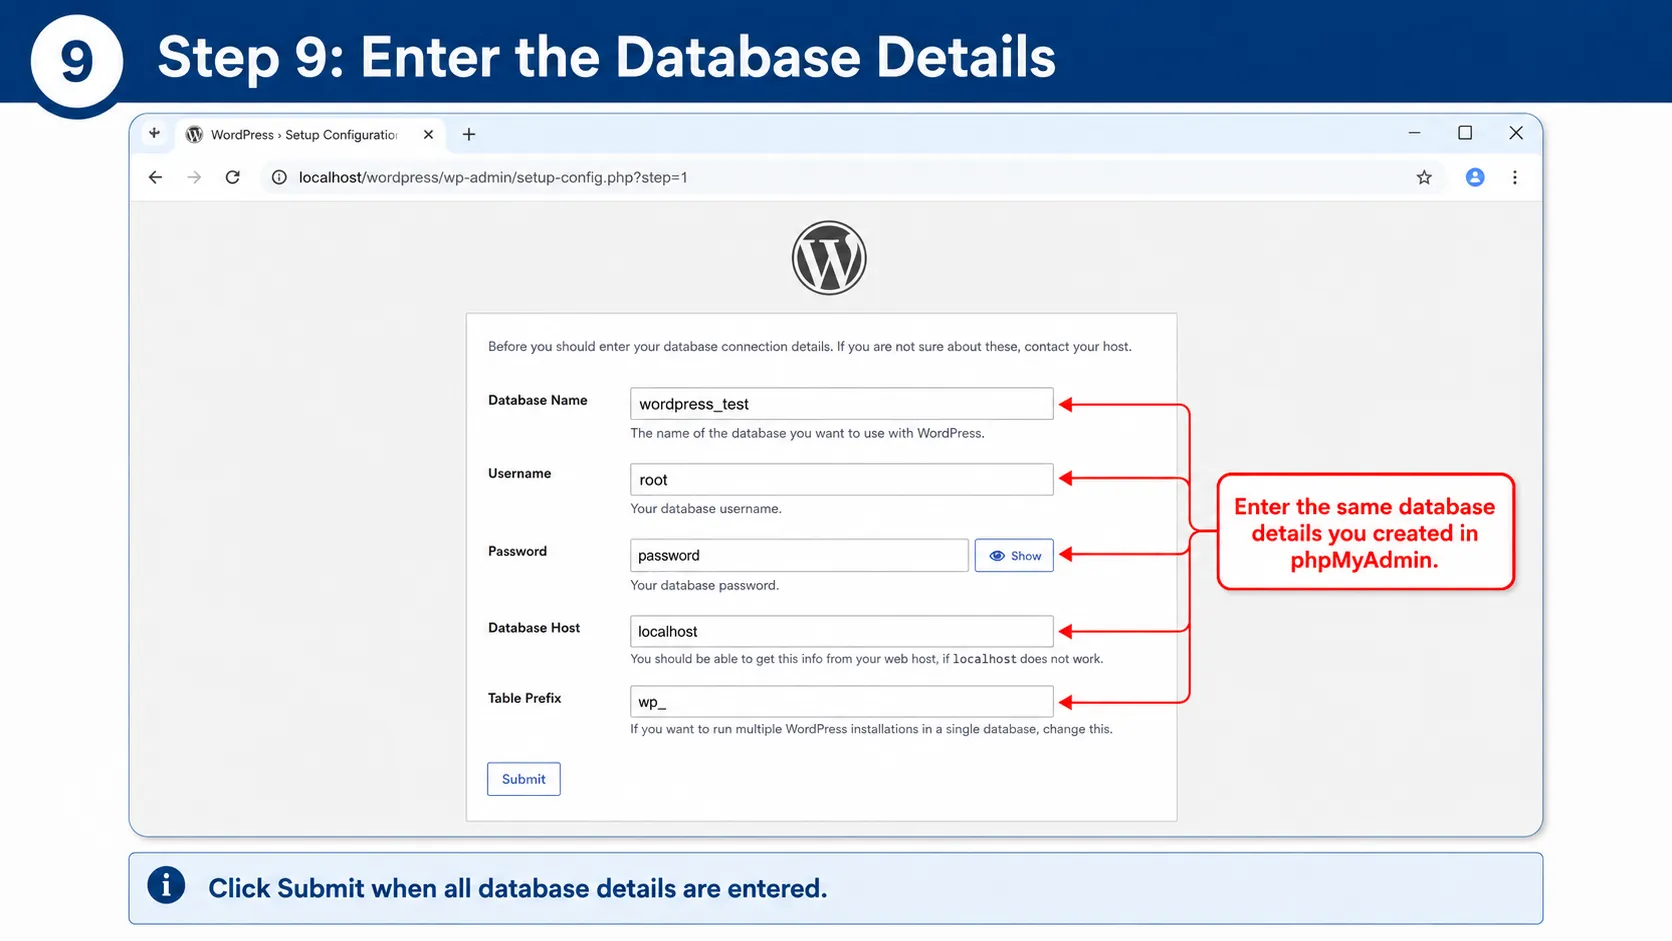
Click Submit. If WordPress connects successfully, click Run the installation.
Next, enter your site title, administrator username, password, and email address, then click Install WordPress.
At this point, the main configuration required to install WordPress on XAMPP is complete.
Step 10: Open the WordPress Dashboard
After WordPress finishes installing, log in using the administrator account you created.
You can access the WordPress dashboard directly at:
http://localhost/wordpress-test/wp-admin/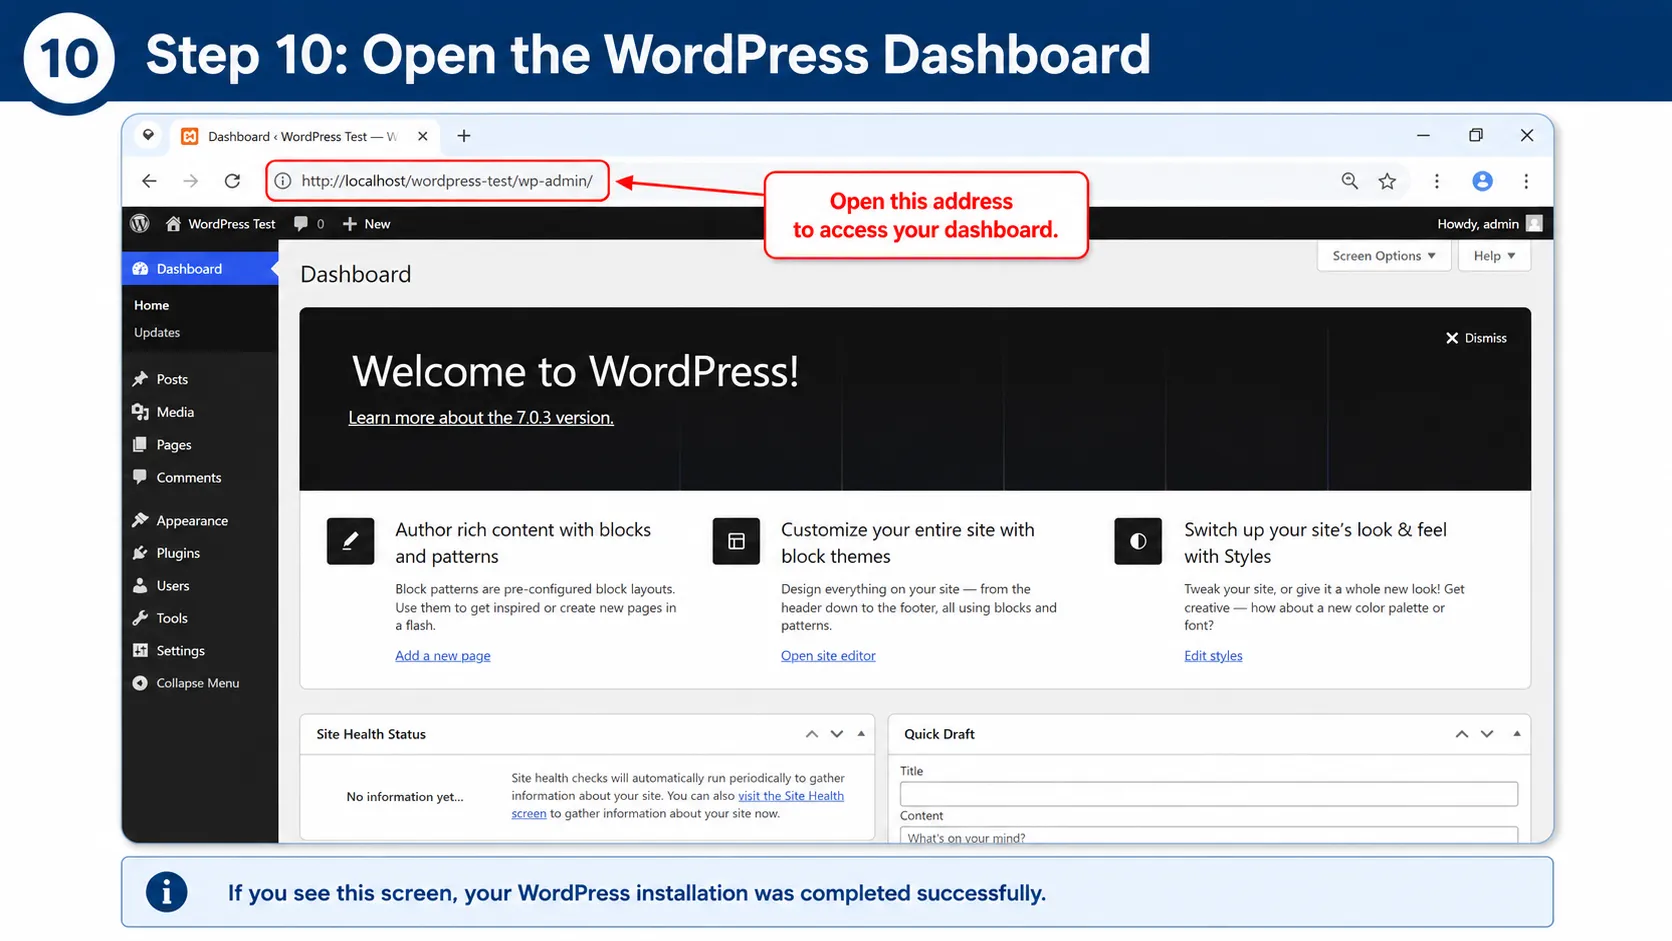
If you can see the WordPress dashboard, you have successfully completed the process to install WordPress on XAMPP.
You can now install plugins, change themes, test updates, or troubleshoot WordPress locally without affecting a public website.
Frequently Asked Questions
Can I install WordPress on XAMPP without hosting?
Yes. You can install WordPress on XAMPP and run the website locally without purchasing a hosting plan.
What username and password should I use for WordPress on XAMPP?
With a standard local XAMPP configuration, WordPress normally connects to MySQL using root as the username and an empty password. If you changed the MySQL credentials, use your configured values instead.
Why does localhost not open WordPress?
Make sure Apache and MySQL are running in the XAMPP Control Panel. Also verify that the WordPress files are inside the correct XAMPP htdocs folder and that the local URL matches the folder name.
Can I install WordPress plugins and themes on XAMPP?
Yes. A local WordPress installation works much like a normal WordPress website, so you can install plugins and themes and test configuration changes locally.
Do I need internet access to use WordPress on XAMPP?
After XAMPP and WordPress are installed, the local website itself can run without an internet connection. Internet access is still required for downloading plugins, themes, updates, and external resources.
Summary
To install WordPress on XAMPP, first install XAMPP and start Apache and MySQL. Then download WordPress and copy the files into the XAMPP htdocs directory.
Next, create a database in phpMyAdmin, enter the database information in WordPress, complete the installation, and log in to the WordPress dashboard.
After you install WordPress on XAMPP, you can safely test themes, plugins, updates, configuration changes, and troubleshooting steps on your local computer.
For more WordPress setup and troubleshooting articles, visit the SupportSolved WordPress guides .
